This chapter describes the hicli tool for managing operations between the Cryptographic Security Platform Vault cluster and an Entrust Policy Agent present in Linux and Windows virtual machines. hicli uses a combination of the Cryptographic Security Platform Vault REST APIs to communicate with Cryptographic Security Platform Vault, and SSH to invoke hcl commands on Windows and Linux VMs.
The Policy Agent provides for encryption of devices within Linux and Windows virtual machines. The Cryptographic Security Platform Vault cluster manages keys and administers the Policy Agent. Administration can take place through the webGUI, through the RESTful APIs, or through using the hicli command.
hicli can only be accessed through the Cryptographic Security Platform Vault for Databases webGUI and the Cryptographic Security Platform Vault for VM Encryption webGUI.
We will be operating with one or more clustered Cryptographic Security Platform Vault nodes, a number of Linux or Windows VMs, and the API Server, a server from which hicli will be invoked. This can be almost any UNIX-like server, including Linux, BSD variants, OS/X and so on.
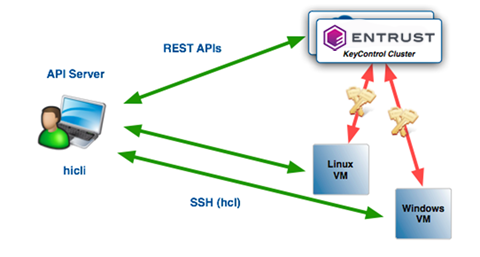
See below for installing and configuring the hicli command-line tool.
Downloading hicli
See below for downloading hicli.
To download hicli
- Log in to the Cryptographic Security Platform Vault for VM Encryption using an account with Cloud Admin privileges.
- In the top menu bar, click Workloads.
- Select Actions > Download Policy Agent.
- From the Available Downloads dialog box, download the
hcs-api-10.5.3-buildnum.tgzfile, wherebuildnumis the build number for the release you are installing.
Extracting hicli
Copy the tgz file to the VM on which you want to install the API and untar it as follows.
$ cd ~$ tar xvfz hcs-api-10.5.3-buildnum.tgz x hcs-api/x hcs-api/hclcomm.pyx hcs-api/kpsapi.pyx hcs-api/docopt.pyx hcs-api/hicliInstalling Python modules
Install the requests and winrm Python modules.
$ pip install requests$ pip install pywinrmSetting the environment variable
Set the PYTHONPATH environment variable to point to the directory where you extracted hicli, and modify your PATH so that the shell can reference the hicli program. For example, if the install location is /Users/spate, the environment variables need to be set up as follows:
$ export PYTHONPATH=$PYTHONPATH:/Users/spate/hcs-api$ export PATH=$PATH:/Users/spate/hcs-apiEnabling the python3 command
If your Python installation only includes a python command and not a python3 command, then do one of the following:
Edit the first line of
hiclifrom#!/usr/bin/env python3to#!/usr/bin/env python.Define an alias like the following:
hicli='python /Users/<user_name>/hcs-api/hicli'
Creating the configuration file
Set up a configuration with the following path:
~/.hicli/hicli.cf This file contains information about the virtual machines to be managed. Specifically:
- The number and location of curly brackets are important. Make sure your configuration file looks like the example below.
- If the platform is not specified, it defaults to
"linux". - Windows platforms require a password to connect over WinRM.
- By default, the
hicli.cfgfile is used to resolve VM names. If no entries are found, DNS is used to resolve the VM names. - On Linux, you can run
hiclicommands asrootor as asudouser. If you specify asudouser, you also specify a password if thesudouser requires one. On Windows, you can runhicliwith any Windows account that has Administrator privileges.
The following sample configuration file registers the following machines.
Virtual machine | OS | Authentication mode |
|---|---|---|
ubuntu10.04 | Linux | Standard root account |
ubuntu12.10 | Linux | Password |
rhel73 | Linux | Passwordless sudo user |
Windows2012r2 | Windows | Administrator account with password |
{ "cvmlist": { "ubuntu10.04": { "host":"192.168.140.129", "port":"22", "user":"root" }, "ubuntu12.10": { "host":"192.168.140.130", "port":"22", "user":"spate", "sudo_password" : "<password>" }, "rhel73": { "host":"192.168.140.131", "port":"22", "user":"jsmith" }, "Windows2012r2": { "host":"192.168.140.132", "user":"Administrator", "password":"<password>", "platform": "windows" } }}To manage another virtual machine with hicli, add that entry to the configuration file.
{ "cvmlist": { "ubuntu10.04": { "host":"192.168.140.129", "port":"22", "user":"root" }, "ubuntu12.10": { "host":"192.168.140.130", "port":"22", "user":"spate", "sudo-password" : "<password>" }, "rhel73": { "host":"192.168.140.131", "port":"22", "user":"jsmith" }, "Windows2012r2": { "host":"192.168.140.132", "user":"Administrator", "password":"<password", "platform": "windows" }, "ubuntu13.04": { "host":"192.168.140.133", "port":"22", "user":"root" } }}Verifying
To verify the installation, run the hicli command and you should see a comprehensive listing of the command and its options.
Setting SSH communication
To set up SSH communication on each Linux host, generate a key pair on the API server and copy the public key to each VM on which you want to run API commands.
In Linux, append the public key to authorized_keys file for either root or the sudo user you specified in the hicli.cfg file
In Windows, use WinRM.
The following example uses ssh-keygen on the API server to generate the key pair and then uses ssh-copy-id to send the public key to the Linux VMs we added to the hicli.cfg file above.
api# cd ~/.sshapi# ssh-keygen -t dsaapi# ssh-copy-id id_dsa.pub root@192.168.140.129api# ssh-copy-id id_dsa.pub spate@192.168.140.130api# ssh-copy-id id_dsa.pub jsmith@192.168.140.131api# ssh-copy-id id_dsa.pub root@192.168.140.133 After you copy the public key to the VM, make sure that, on each VM:
- You enable root or sudo user login over SSH to the VM. If you are using a passwordless sudo user, you need to set up passwordless SSH access for that user using the pub.
- You turn off SSH warnings.
To test that SSH access is working between your API server and your VM, issue a test command over SSH. For example, you can use SSH to query the hostname on the VM:
$ ssh root@192.168.140.129 hostname ubuntu10.04